Rendering in Angular2
Get an idea of how Angular2 internal rendering system works

12Angular2 is currently in beta with a stable release hopefully coming out sometime in the coming months. Lot's of new amazing stuff is being developed both inside and outside of the framework. New features such as a new version of NgAnimate, a pre-compilation build-step, and even Web Worker support are all coming to the framework. Another super cool feature that is in Angular2 is custom rendering. With the new design decisions that Angular2 has brought forth, the possibility of setting up a custom renderer to take on the UI responiblities is something that is possible.
Let's briefly dive into how the rendering architecture of Angular2 works.
1.0 Why Rendering?
You may be wondering why (with such a long pause in between articles) all of a sudden an article pops up about Angular2 rendering? Well because I work on the Angular2 project full-time (mostly Angular2 animations and other core areas of the framework), it's easy to get lost in the thousands and thousands of lines of source code surrounding the new framework. One such area which I've found to be super impressive is the architecture of how the Angular2 renderer operates.
The DOM Renderer in Angular2 is built in such a way that it allows it to be extended and overridden with rendering code that can render the application in another environment besides the DOM. What exactly does this mean? Well what if we could render our entire Angular2 application in a web view inside of Electron or PhoneGap by just changing a JavaScript class? What about if we could render HTML code in something like a canvas element just for the fun of it? Well Angular2's rendering architecture allows for this kind functionality to work.
1.1 What does rendering mean again?
Rendering in Angular2 means how the framework decides to draw/print/display the application. Almost 100% time this means that the application will be rendered in the DOM (duhh it's a web application), but sometimes it makes sence to render it in a different environment.
Note: Experimental
Keep in mind that the code within this article and within the github repositories is subject to change. Due to the fact that Angular2 is in beta, this means that the underlying Renderer API code may change. Also keep in mind that the more experimental renderers (such as the canvas renderer) are just a proof of concept for now, but, who knows, maybe something stable and practical will come around in the future...
Note: Typescript
The code examples and github code featured in this article is coded with a typed superset of JavaScript called TypeScript. TypeScript is developed by Microsoft and is used all throughout the Angular2 codebase. Therefore if you see anything in the JavaScript/TypeScript code below that looks like it deviates from regular JavaScript then keep in mind that is is apart of the TypeScript language and if you intend on writing your own renderer then it's probably best to do so with TypeScript.
to top2.0 The Angular2 Renderer
So how exactly is Angular2 built such that it allows for custom renderers to be created? The first thing to understand is that the internal bits of Angular2 are split into two areas: the worker (core) area and the UI area.
The worker (core) area is responsible for building out the components, directives, filters, services and bootstrap code; The UI area is responible for rendering out the application in the DOM. Another way to think of this is that the worker area is the CPU/memory of the application and the UI area is the graphics card.
When an Angular2 application is doing its thing, the worker area sends instructions over to the UI area describing what elements to insert/remove into/from the DOM and what other DOM-related properties to update. The UI area then listens on the set event listeners and then tells the worker area what user-driven activities have occurred.

Angular2 is built this way to allow for web worker support and to minimize DOM access. It is also constructed in this way to allow Angular2 to run in a server environment for pre-compilation purposes.
Why does all of this stuff matter? Well understanding how and why the worker/ui separation works is important to understanding how to create your own renderer. And now that we understand the basis of why this is designed this way, let's see what it takes to create our own renderer.
to top3.0 Making our own Renderer
Once again, this is experimental. We will be extending the default DomRenderer class to patch some of the methods to allow us to render our Angular2 application in a canvas element. Sounds crazy? Yes. Sounds useless? Maybe. But it's a fun exercise non-the-less.
3.1 A Simple Example of the API
Due to the fact that the API may change before Angular 2.0 stable has been released, it's best to have a look at this code directly on github. However, it is also important that we go over at least some of the render code. So with that said, let's see the basics of our canvas renderer:
// NOTE this is typescript code
// Most of these imports are burried deep in the framework...
import {DomRenderer, DomRootRenderer} from 'angular2/src/platform/dom/dom_renderer';
import {provide, Renderer, RenderComponentType, RootRenderer} from 'angular2/core';
import {ChangeDetectorGenConfig} from 'angular2/src/core/change_detection/interfaces';
class CanvasRootRenderer extends DomRootRenderer {
  constructor(_eventManager: EventManager, sharedStylesHost: DomSharedStylesHost, animate: AnimationBuilder) {
    super(document, _eventManager, sharedStylesHost, animate);
  }
  renderComponent(componentProto: RenderComponentType): Renderer {
    // create a new canvas renderer
    return new CanvasRenderer(this, componentProto);
  }
}
class CanvasRenderer extends DomRenderer {
  constructor(_rootRenderer: CanvasRootRenderer, componentProto: RenderComponentType) {
    super(_rootRenderer, componentProto);
  }
  createElement(parent: Element, name: string): Node {
    // this is called for every HTML element in the template
  }
  createViewRoot(hostElement: any): any {
    // this is called for the component root
  }
  createText(parentElement: any, value: string): any {
    // this is called for every text node in the template
  }
  setText(renderNode: any, text: string): void {
    // this is called when a binding sets its text value
  }
  attachViewAfter(node: any, viewRootNodes: any[]) {
    // this is called when nodes are inserted dynamically (ngFor, ngIf, etc...)
  }
}
// this your actual application
import {MyApp} from './my-app/my-app';
bootstrap(MyApp, [
  // bind the renderer to the application
  provide(RootRenderer, { useClass: CanvasRootRenderer }),
  // this is only here to not have Angular2 do code generation (which is something
  // that may get in the way when creating a custom component since we won't
  // creating our own code generation per renderer)
  provide(ChangeDetectorGenConfig, {
    useValue: new ChangeDetectorGenConfig(true, false, false)
  })
]);
This render code above is just the skeleton for setting up a renderer. When Angular attempts to render out the application it will execute the various function calls present on the active renderer (by default DomRenderer however in this case CanvasRenderer). Therefore whatever code is executed within these methods can allow us to render out the application in a different way than just within the DOM.
Say for example, instead of inserting an item into the DOM, we want to just print out a canvas block that says the name of the element. We can do so inside of our render code:
// NOTE this is typescript code
class CanvasRenderer extends DomRenderer {
  private y: number = 0;
  constructor(_rootRenderer: CanvasRootRenderer, componentProto: RenderComponentType) {
    super(_rootRenderer, componentProto);
  }
  get ctx() {
    return this.canvas.getContext('2d');
  }
  createElement(parent: Element, name: string): Node {
    this.ctx.strokeRect(0, 0, this.width, 50);
    this.ctx.font = "30px Monospace";
    this.ctx.fillText(name, 20, this.y + 10);
    this.y += 50;
  }
  createViewRoot(hostElement: any): any {
    this.canvas = document.createElement('canvas');
    this.canvas.height = 500;
    this.canvas.width = document.body.offsetWidth; //size of the page
    hostElement.appendChild(this.canvas);
  }
}
Now the canvas container will display each element within the template code one by one on screen. Now this code isn't functional on its own, but the application below is one that is operational.
3.2 A Working Example
Have a look at: https://github.com/matsko/angular2-canvas-renderer-experiment. Run the installation steps outlined in the README and see the application in action.
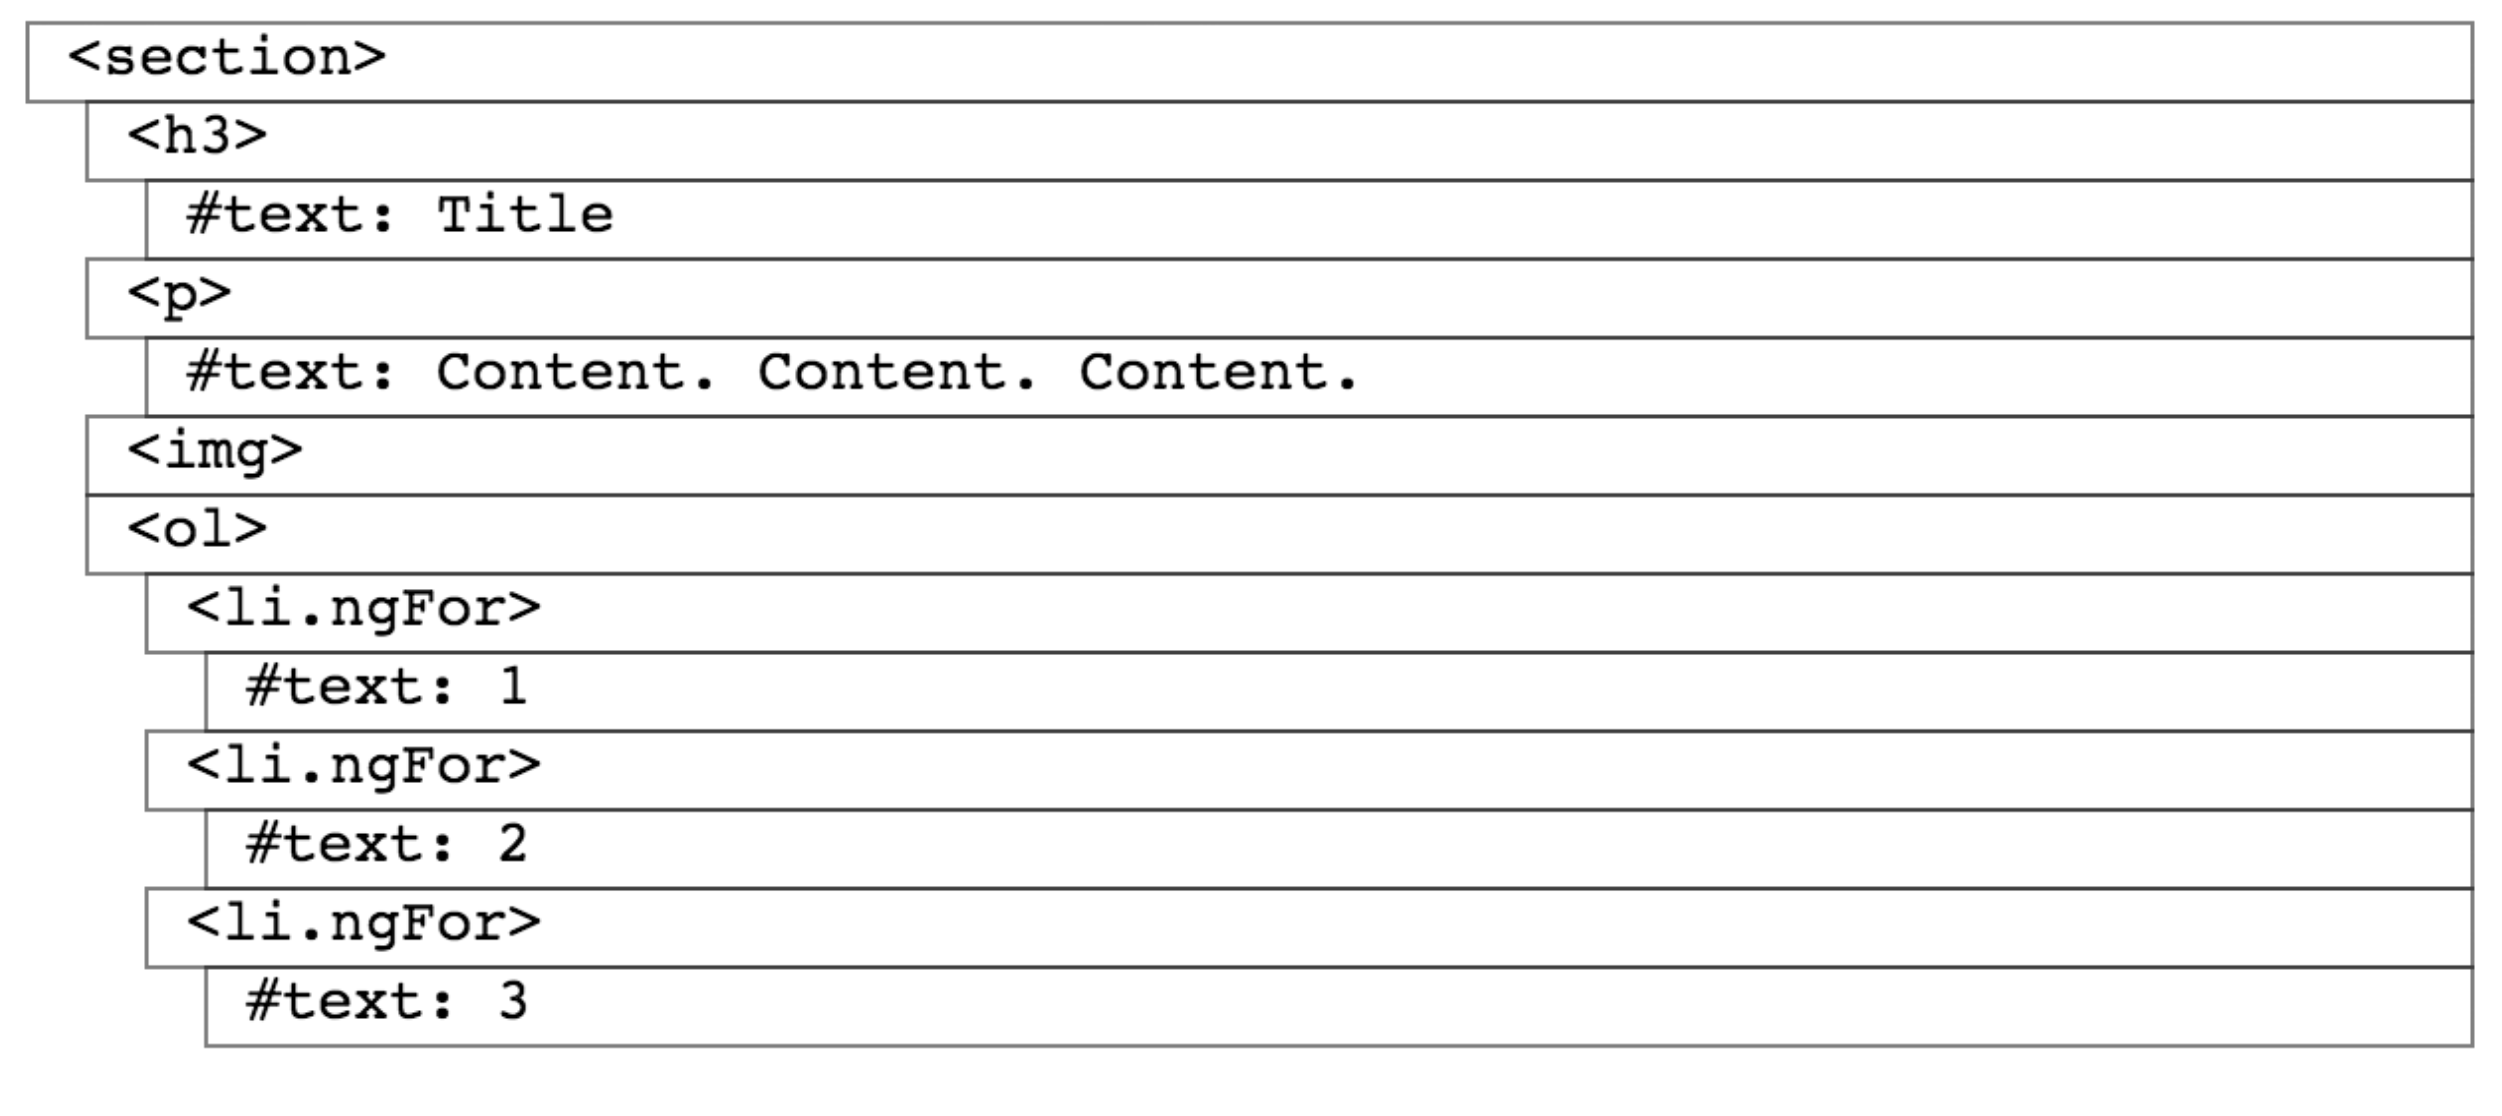
Notice how the render code is able to take the application HTML code...
<section>
  <h3>Title</h3>
  <p>
    Content. Content. Content.
  </p>
  <img src="./content-image.jpg" />
  <ol>
    <li *ngFor="#item of items" class="ngFor" [attr.id]="item">
      {{ item }}
    </li>
  </ol>
</section>
And render it through the canvas renderer into this:
Be sure to look over the code inside of src/app.ts to see the full renderer code.
Click here to see the github repo code
to top4.0 Angular Electron Renderer
Let's shift our focus to experimenting with another renderer...
Electron is a project developed by Github and used by the Atom editor that allows for a web application to be rendered and executed as if it were a desktop application. (It's essentially phonegap for desktop.)
The Angular project has a plugin being developed to allow Electron to be used as a renderer within an Angular app, angular/angular-electron, but it isn't fully ready for use just yet. For now it's best to play with a pre-existing appilcation that makes use of Angular2 and electron and then deconstruct the internal code to see how it all works.
4.1 Angular Electron Demo App
The project below contains two files: src/web.ts and src/desktop.ts both of which contain the necessary boostrap code to kickstart the Angular2 application in web and desktop. The former contains our standard web bootstrap code while latter contains a bootstrap call that is imported from the angular-electron plugin.
import {bootstrap} from 'angular2/platform/browser';
import {MyApp} from './app/my-app';
bootstrap(MyApp);
import {bootstrap} from 'angular2/platform/browser';
import {MyApp} from './app/my-app';
bootstrap(MyApp);// the actual code for the import is different,
// but this is what the import statement should look
// like once the angular2-electron plugin is ready.
import {bootstrap} from 'angular2-electron';
import {MyApp} from './app/my-app';
bootstrap(MyApp);Once again, please view the actual github application code to see all the code.
When run, the application will render in both web and desktop (an actual desktop application). The screenshots below show this in action:


Besides the bootstrap files and some changes to how modules are loaded for electron, the core parts of the application are the same. The link below points to this the demo application for this. Click below to see more.
Click here to see the github repo code
to top5.0 Recap
Rendering in Angular2 is still in it's API infancy. Yes the API may change before stable is released, but this shouldn't let us experiment with cool ways to render an Angular2 application. Please play around with this cool new feature and see what you guys come up with.
A special thanks to Leonardo Zizzamia (@zizzamia) for helping put together and experiment with this material. Be sure to view his talk from the Angular Netherlands Conference (ng-nl) (I will post it here once it has been put up online).
Also a grand thanks to Tobias Bosch, Rob Wormald, and the rest of the Angular Team. It is great working with you super talented guys. Oh and thank you to the Angular community and to everyone who put the time into reading this material. Thanks again! :)
to top